网上资料乱七八糟的,在这记录一下。
Table of contents
免密 sudo
修改 /etc/sudoers 文件。
找到以下这行
%sudo ALL=(ALL:ALL) ALL
修改为
%sudo ALL=(ALL:ALL) NOPASSWD:ALL
固定 IP
Ubuntu Server 使用 netplan 配置网络。
在 /etc/netplan 内找到对应的配置文件,如 00-installer-config.yaml。
参考 man 5 netplan 进行配置,我的配置文件如下:
network:
  ethernets:
    ens160:
      dhcp4: no
      addresses:
        - 192.168.1.171/24
      gateway4: 192.168.1.162
      nameservers:
        addresses: [192.168.1.112, 8.8.8.8]
  version: 2
sudo netplan apply 应用更改。
修改主机名
sudo hostnamectl set-hostname your-hostname
存储扩容
Ubuntu Server 使用
确实比较复杂,但也很灵活。
我用的是 vSphere 虚拟机。首先在 vCenter 里增加磁盘容量。

sudo reboot 重启,使更改生效。
sudo fdisk -l 列出所有设备。
(...)
GPT PMBR size mismatch (20971519 != 52428799) will be corrected by write.
The backup GPT table is not on the end of the device. This problem will be corrected by write.
Disk /dev/sda: 25 GiB, 26843545600 bytes, 52428800 sectors
Disk model: Virtual disk
Units: sectors of 1 * 512 = 512 bytes
Sector size (logical/physical): 512 bytes / 512 bytes
I/O size (minimum/optimal): 512 bytes / 512 bytes
Disklabel type: gpt
Disk identifier: 3C880C2B-2144-44D6-942C-80780689FED0

Device       Start      End  Sectors  Size Type
/dev/sda1     2048     4095     2048    1M BIOS boot
/dev/sda2     4096  1861631  1857536  907M Linux filesystem
/dev/sda3  1861632 20969471 19107840  9.1G Linux filesystem
(...)
物理磁盘已经扩容成功,我们接下来创建
$ sudo fdisk /dev/sda

Welcome to fdisk (util-linux 2.34).
Changes will remain in memory only, until you decide to write them.
Be careful before using the write command.

GPT PMBR size mismatch (20971519 != 52428799) will be corrected by write.
The backup GPT table is not on the end of the device. This problem will be corrected by write.

Command (m for help): n
Partition number (4-128, default 4):
First sector (20969472-52428766, default 20969472):
Last sector, +/-sectors or +/-size{K,M,G,T,P} (20969472-52428766, default 52428766):

Created a new partition 4 of type 'Linux filesystem' and of size 15 GiB.

Command (m for help): w
The partition table has been altered.
Syncing disks.
sudo fdisk -l 再次列出所有设备。
(...)
Device        Start      End  Sectors  Size Type
/dev/sda1      2048     4095     2048    1M BIOS boot
/dev/sda2      4096  1861631  1857536  907M Linux filesystem
/dev/sda3   1861632 20969471 19107840  9.1G Linux filesystem
/dev/sda4  20969472 52428766 31459295   15G Linux filesystem
(...)
已经看到新建的分区 /dev/sda4。
$ sudo pvcreate /dev/sda4
  Physical volume "/dev/sda4" successfully created.
PV 新建完成。请记住这个新的 PV 名。
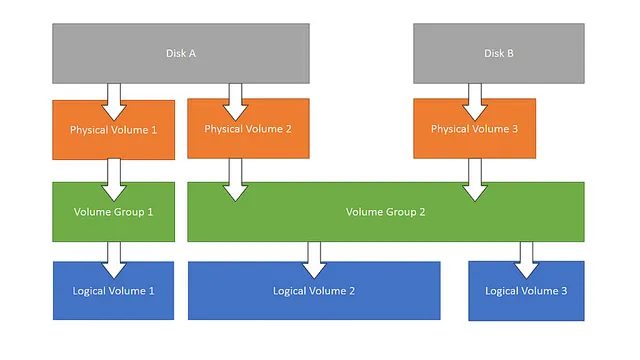
回忆一下上面的架构图,我们需要将 PV 添加到
$ sudo vgs
  VG        #PV #LV #SN Attr   VSize  VFree
  ubuntu-vg   1   1   0 wz--n- <9.11g    0
得到 VG 名。
$ sudo vgextend ubuntu-vg /dev/sda4
  Volume group "ubuntu-vg" successfully extended
扩展 VG。这里的 /dev/sda4 应该为你之前记住的 PV 名。
现在我们需要将扩展完成的 VG 扩展到
再次 sudo fdisk -l 列出所有设备。
(...)
Disk /dev/mapper/ubuntu--vg-ubuntu--lv: 9.11 GiB, 9781116928 bytes, 19103744 sectors
Units: sectors of 1 * 512 = 512 bytes
Sector size (logical/physical): 512 bytes / 512 bytes
I/O size (minimum/optimal): 512 bytes / 512 bytes
得到 LV 设备名。
$ sudo lvextend /dev/mapper/ubuntu--vg-ubuntu--lv /dev/sda4
  Size of logical volume ubuntu-vg/ubuntu-lv changed from <9.11 GiB (2332 extents) to <24.11 GiB (6171 extents).
  Logical volume ubuntu-vg/ubuntu-lv successfully resized.
扩展 LV。这里的 /dev/sda4 应该为你之前记住的 PV 名。
此时 LVM 的部分就完成了,可以调整文件系统的大小了。
$ sudo resize2fs /dev/mapper/ubuntu--vg-ubuntu--lv
resize2fs 1.45.5 (07-Jan-2020)
Filesystem at /dev/mapper/ubuntu--vg-ubuntu--lv is mounted on /; on-line resizing required
old_desc_blocks = 2, new_desc_blocks = 4
The filesystem on /dev/mapper/ubuntu--vg-ubuntu--lv is now 6319104 (4k) blocks long.
$ sudo df -h
Filesystem                         Size  Used Avail Use% Mounted on
(...)
/dev/mapper/ubuntu--vg-ubuntu--lv   24G  4.2G   19G  19% /
检查一下,扩容成功。